
Getting Started
Welcome to Madhyamas — an open-source HTTP/HTTPS debugging proxy that lets you inspect, modify, and replay network traffic between your applications and the servers they talk to. Whether you're debugging an API, testing error handling, or simulating slow networks, Madhyamas gives you full visibility and control.
What You'll Need
- macOS, Windows, or Linux computer
- A terminal/command prompt
- The application or device you want to debug (browser, mobile app, API client, etc.)
Installation
Madhyamas ships as a single unified binary — the proxy server, web UI, MCP server, and CLI are all in one executable. Web UI assets are embedded in the binary, so there are no extra files to download.
At a glance
| Platform | Recommended | Also available |
|---|---|---|
| macOS | Homebrew | Pre-built binary, cargo install |
| Windows | MSI installer | Chocolatey, pre-built .zip, cargo install |
| Linux | Pre-built binary | Snap, RPM, cargo install |
| Any (containerized) | Docker | Kubernetes |
Option 1: Homebrew (macOS / Linux)
brew tap ShristiLabs/tap
brew install madhyamas
Option 2: Cargo (any platform with a Rust toolchain)
cargo install madhyamasOption 3: Windows (MSI / Chocolatey)
Download the .msi installer from the GitHub Releases page and run it, or use Chocolatey:
choco install madhyamasOption 4: Pre-built binary (all platforms)
Download the archive for your platform from the GitHub Releases page, extract it, and put the binary on your PATH.
# macOS / Linux
tar -xzf madhyamas-*.tar.gz
sudo mv madhyamas /usr/local/bin/

# Windows
# Extract the .zip and add madhyamas.exe to your PATH
Pre-built binaries are published for:
- Linux —
x86_64,aarch64,armv7,armv6,riscv64 - macOS —
x86_64(Intel),aarch64(Apple Silicon) - Windows —
x86_64(.zipand.msi)
Option 5: Linux package managers
# Snap (Ubuntu, Debian, …)
sudo snap install madhyamas

# RPM (Fedora, RHEL, CentOS) — download the .rpm from Releases, then:
sudo dnf install ./madhyamas-*.x86_64.rpm
Verify the installation
madhyamas --versionDocker
A pre-built multi-arch image (linux/amd64 and linux/arm64) is published to the GitHub Container Registry for every release.
docker pull ghcr.io/shristilabs/madhyamas:latestRun it with the proxy and web UI ports published, and a named volume for persistent state. You must pass --host 0.0.0.0 so the ports are reachable outside the container, and use the --cert-path / --db-path / --log-path flags to place state on the mounted volume:
docker run -d \
  --name madhyamas \
  -p 8888:8888 \
  -p 3001:3001 \
  -v madhyamas-data:/data \
  ghcr.io/shristilabs/madhyamas:latest \
  --host 0.0.0.0 \
  --cert-path /data/certs \
  --db-path /data/traffic.db \
  --log-path /data/logs
Then open http://localhost:3001.
Pin a version in production
Replace :latest with a specific tag, e.g. ghcr.io/shristilabs/madhyamas:0.1.6 (or the :0.1 minor tag) to avoid surprise upgrades.
Connecting mobile devices to a containerized proxy
The container can't auto-detect your host's LAN IP. Set --public-ip <your-host-LAN-IP> so the UI shows the correct address for clients on your network:
docker run -d --name madhyamas \
  -p 8888:8888 -p 3001:3001 \
  -v madhyamas-data:/data \
  ghcr.io/shristilabs/madhyamas:latest \
  --host 0.0.0.0 --public-ip 192.168.1.50 \
  --cert-path /data/certs --db-path /data/traffic.db --log-path /data/logs
Available image tags: :latest, :<version> (e.g. :0.1.6), and :<major>.<minor> (e.g. :0.1).
Kubernetes
Madhyamas is a stateful single-instance service (it owns its CA certificate and traffic database), so run it with one replica and a PersistentVolumeClaim. Save the manifest below as madhyamas.yaml and run kubectl apply -f madhyamas.yaml.
---
apiVersion: v1
kind: Namespace
metadata:
  name: madhyamas
---
apiVersion: v1
kind: PersistentVolumeClaim
metadata:
  name: madhyamas-data
  namespace: madhyamas
spec:
  accessModes: [ReadWriteOnce]
  resources:
    requests:
      storage: 5Gi
---
apiVersion: apps/v1
kind: Deployment
metadata:
  name: madhyamas
  namespace: madhyamas
spec:
  replicas: 1
  selector:
    matchLabels:
      app: madhyamas
  template:
    metadata:
      labels:
        app: madhyamas
    spec:
      containers:
        - name: madhyamas
          image: ghcr.io/shristilabs/madhyamas:0.1.6
          args:
            - --host
            - "0.0.0.0"
            - --cert-path
            - /data/certs
            - --db-path
            - /data/traffic.db
            - --log-path
            - /data/logs
          ports:
            - name: proxy
              containerPort: 8888
            - name: api
              containerPort: 3001
          volumeMounts:
            - name: data
              mountPath: /data
          readinessProbe:
            httpGet:
              path: /health
              port: 3001
            initialDelaySeconds: 5
            periodSeconds: 5
          livenessProbe:
            httpGet:
              path: /health
              port: 3001
            initialDelaySeconds: 30
            periodSeconds: 15
          resources:
            requests:
              memory: 256Mi
              cpu: 250m
            limits:
              memory: 1Gi
              cpu: "1"
      volumes:
        - name: data
          persistentVolumeClaim:
            claimName: madhyamas-data
---
apiVersion: v1
kind: Service
metadata:
  name: madhyamas
  namespace: madhyamas
spec:
  type: ClusterIP        # use LoadBalancer, or front it with an Ingress, for external clients
  selector:
    app: madhyamas
  ports:
    - name: proxy
      port: 8888
      targetPort: 8888
    - name: api
      port: 3001
      targetPort: 3001
Access it from your workstation:
# Forward both ports to your machine
kubectl -n madhyamas port-forward svc/madhyamas 8888:8888 3001:3001
Notes:
- One replica only. Scaling to >1 creates independent CA certificates and traffic stores. If you need HA, front a single instance with an Ingress and share a volume via RWX, or shard clients across instances.
- Pin the image tag to a version (
:0.1.6) rather than:latestso rollouts are deliberate. - External clients (e.g. a phone) need the Service exposed — change
type: ClusterIPtotype: LoadBalancer, or add an Ingress for the API port. The proxy port should generally stay behind the cluster unless you specifically want off-cluster clients. - The CA certificate persists on the PVC (
/data/certs), so clients only need to trust it once.
Starting the Proxy
Open a terminal and run:
madhyamas serveYou'll see output like this:
Madhyamas is ready!
Proxy: http://127.0.0.1:8888
Web UI: http://127.0.0.1:3001
By default the proxy binds to 127.0.0.1 (loopback only). To accept connections from other devices on your network — a phone, another machine, or a containerized client — bind all interfaces:
madhyamas serve --host 0.0.0.0 --public-ip <your-LAN-IP>This starts two services:
| Service | Default port | Purpose |
|---|---|---|
| Proxy | 8888 | Receives HTTP/HTTPS traffic from your applications |
| Web UI | 3001 | Browser-based dashboard for inspecting and controlling traffic |
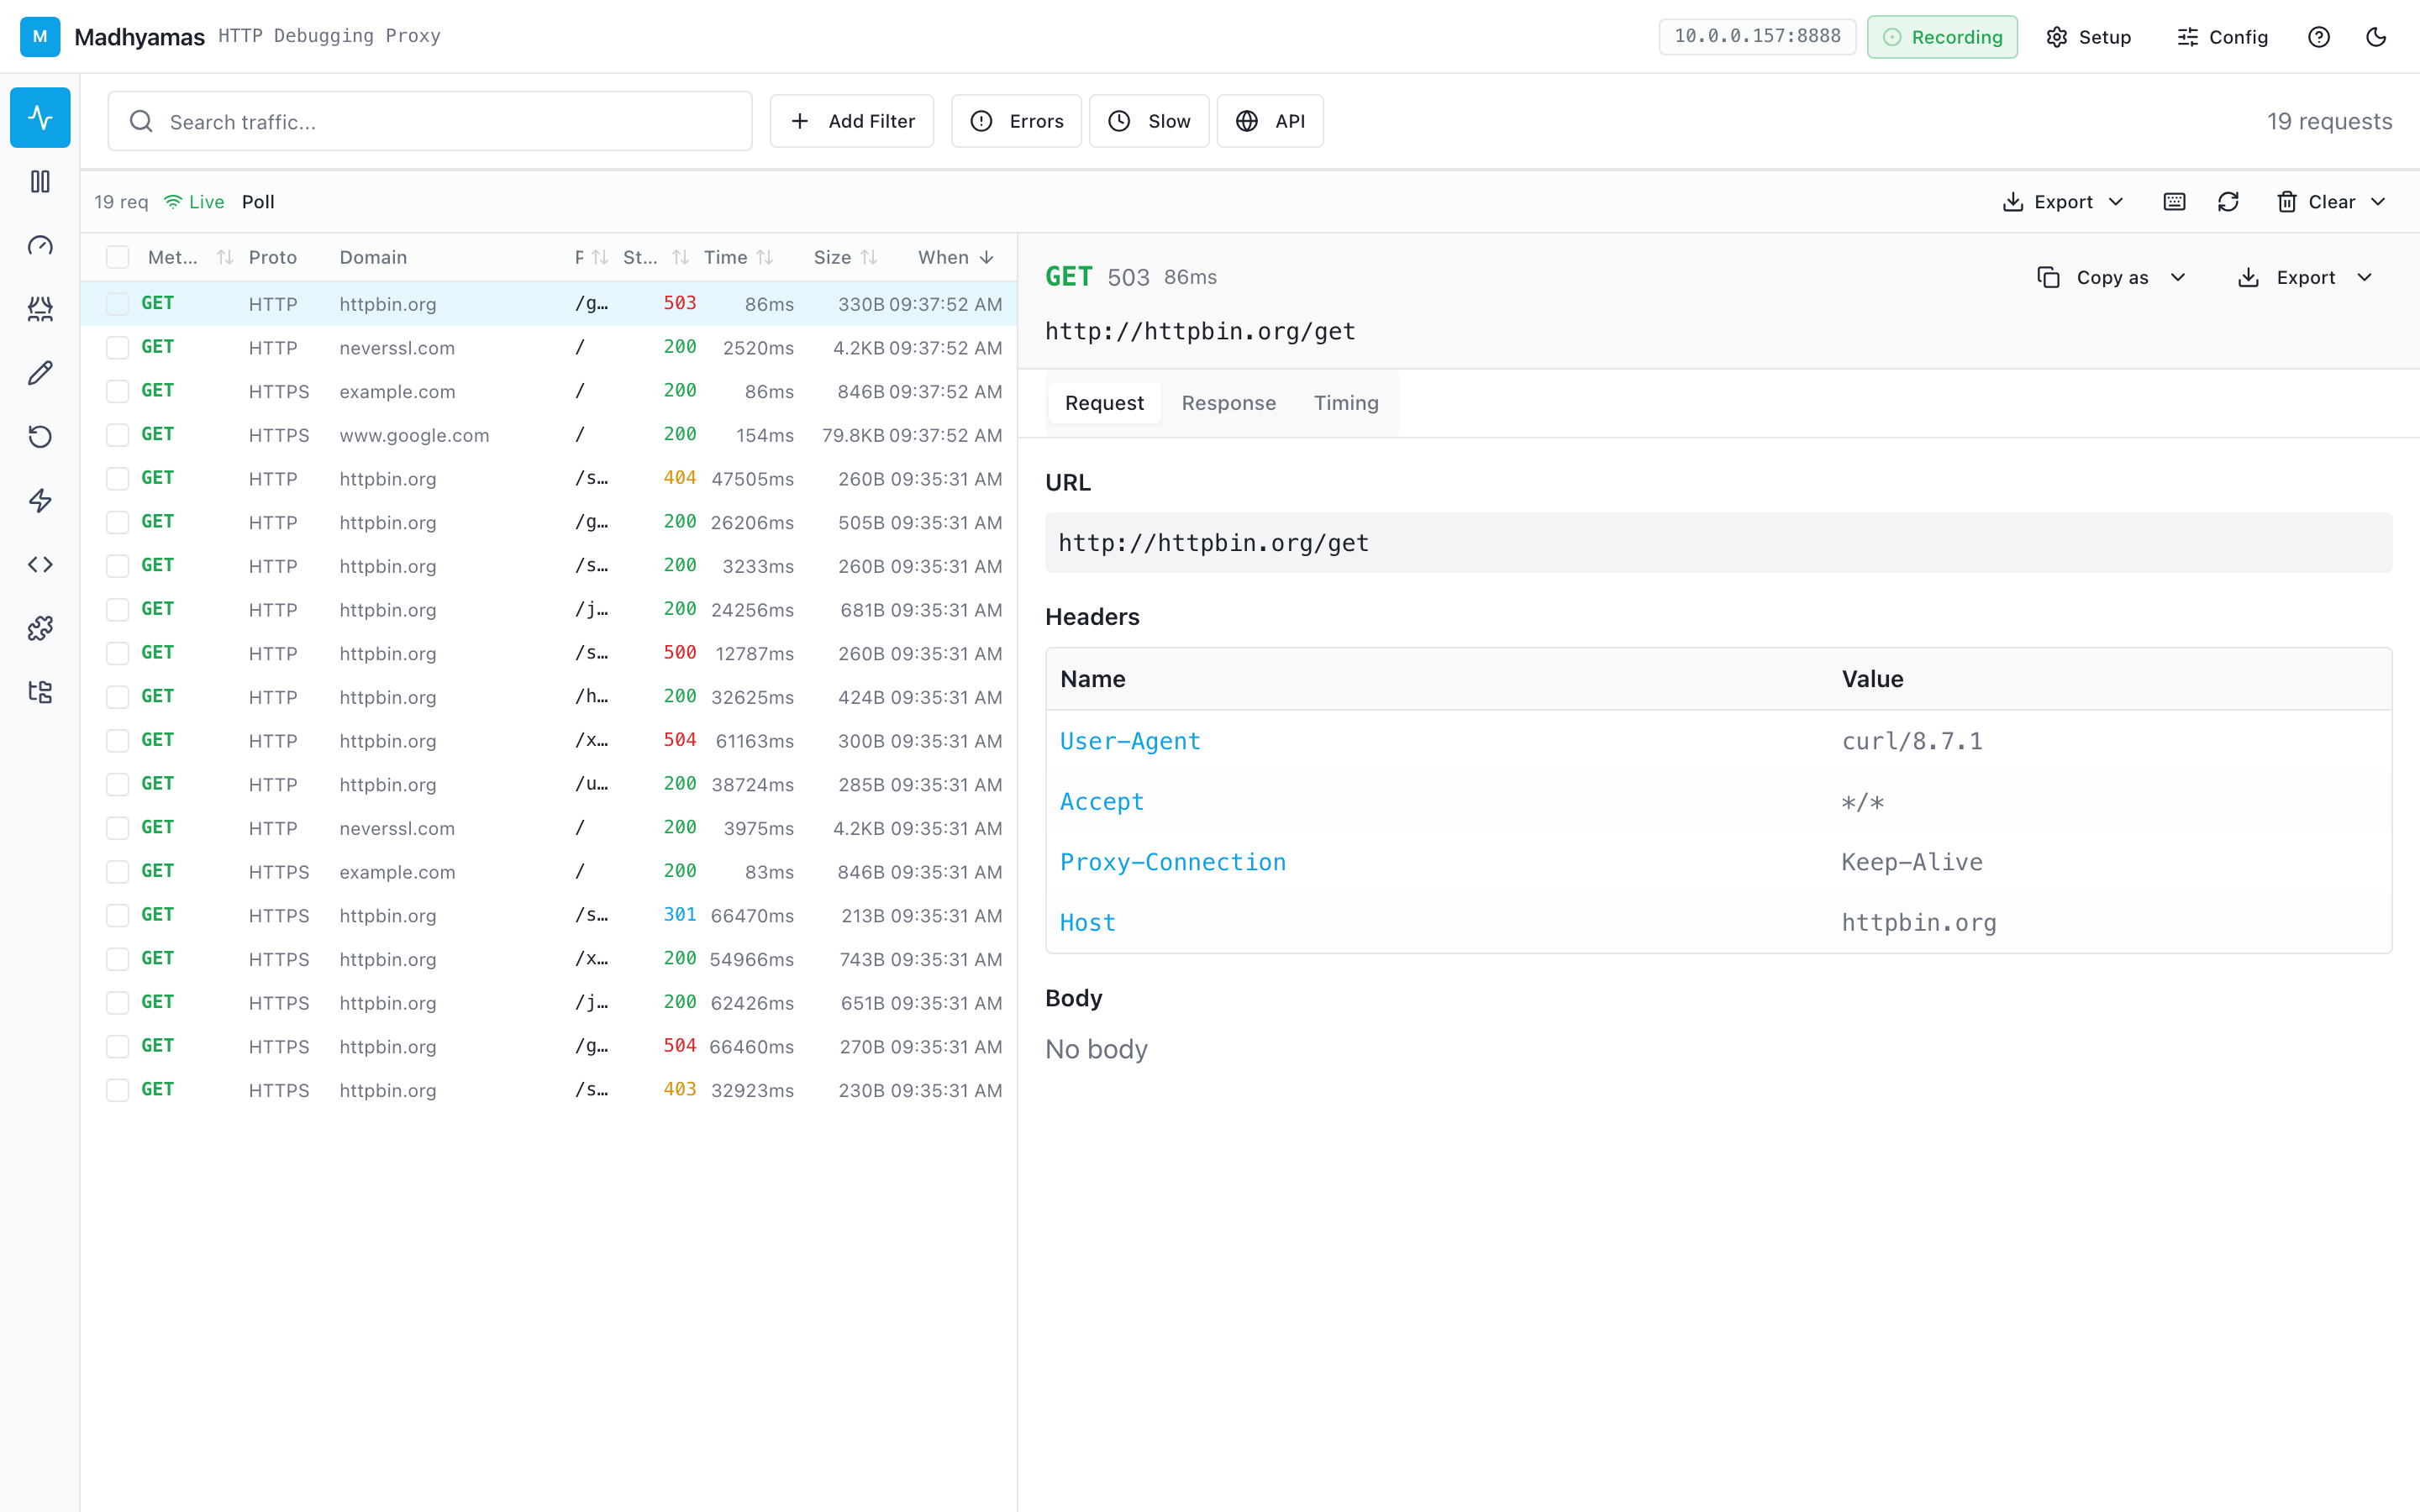
Open http://localhost:3001 in your browser to see the Madhyamas dashboard.
Connecting Your First Client
Browser (Chrome / Firefox / Safari)
Configure your browser to use the proxy at localhost:8888:
- Firefox: Settings → Network Settings → Manual proxy configuration → HTTP Proxy:
localhost, Port:8888 - Chrome: Launch with
--proxy-server=localhost:8888or use system proxy settings - Safari: System Settings → Network → Advanced → Proxies → Web Proxy (HTTP):
localhost:8888
Once configured, visit any website. You'll see the traffic appear in the Madhyamas dashboard in real time.
Command-Line Tools (curl)
curl -x http://localhost:8888 http://httpbin.org/getMobile Devices
See the Mobile Setup guide for detailed instructions on connecting phones and tablets.
HTTPS Interception
By default, Madhyamas intercepts HTTPS traffic by generating a local Certificate Authority (CA) and creating certificates on the fly. To avoid browser warnings, you need to install the Madhyamas CA certificate on your system.
The easiest way is to click the Setup button in the top toolbar — it provides platform-specific instructions and a download link.
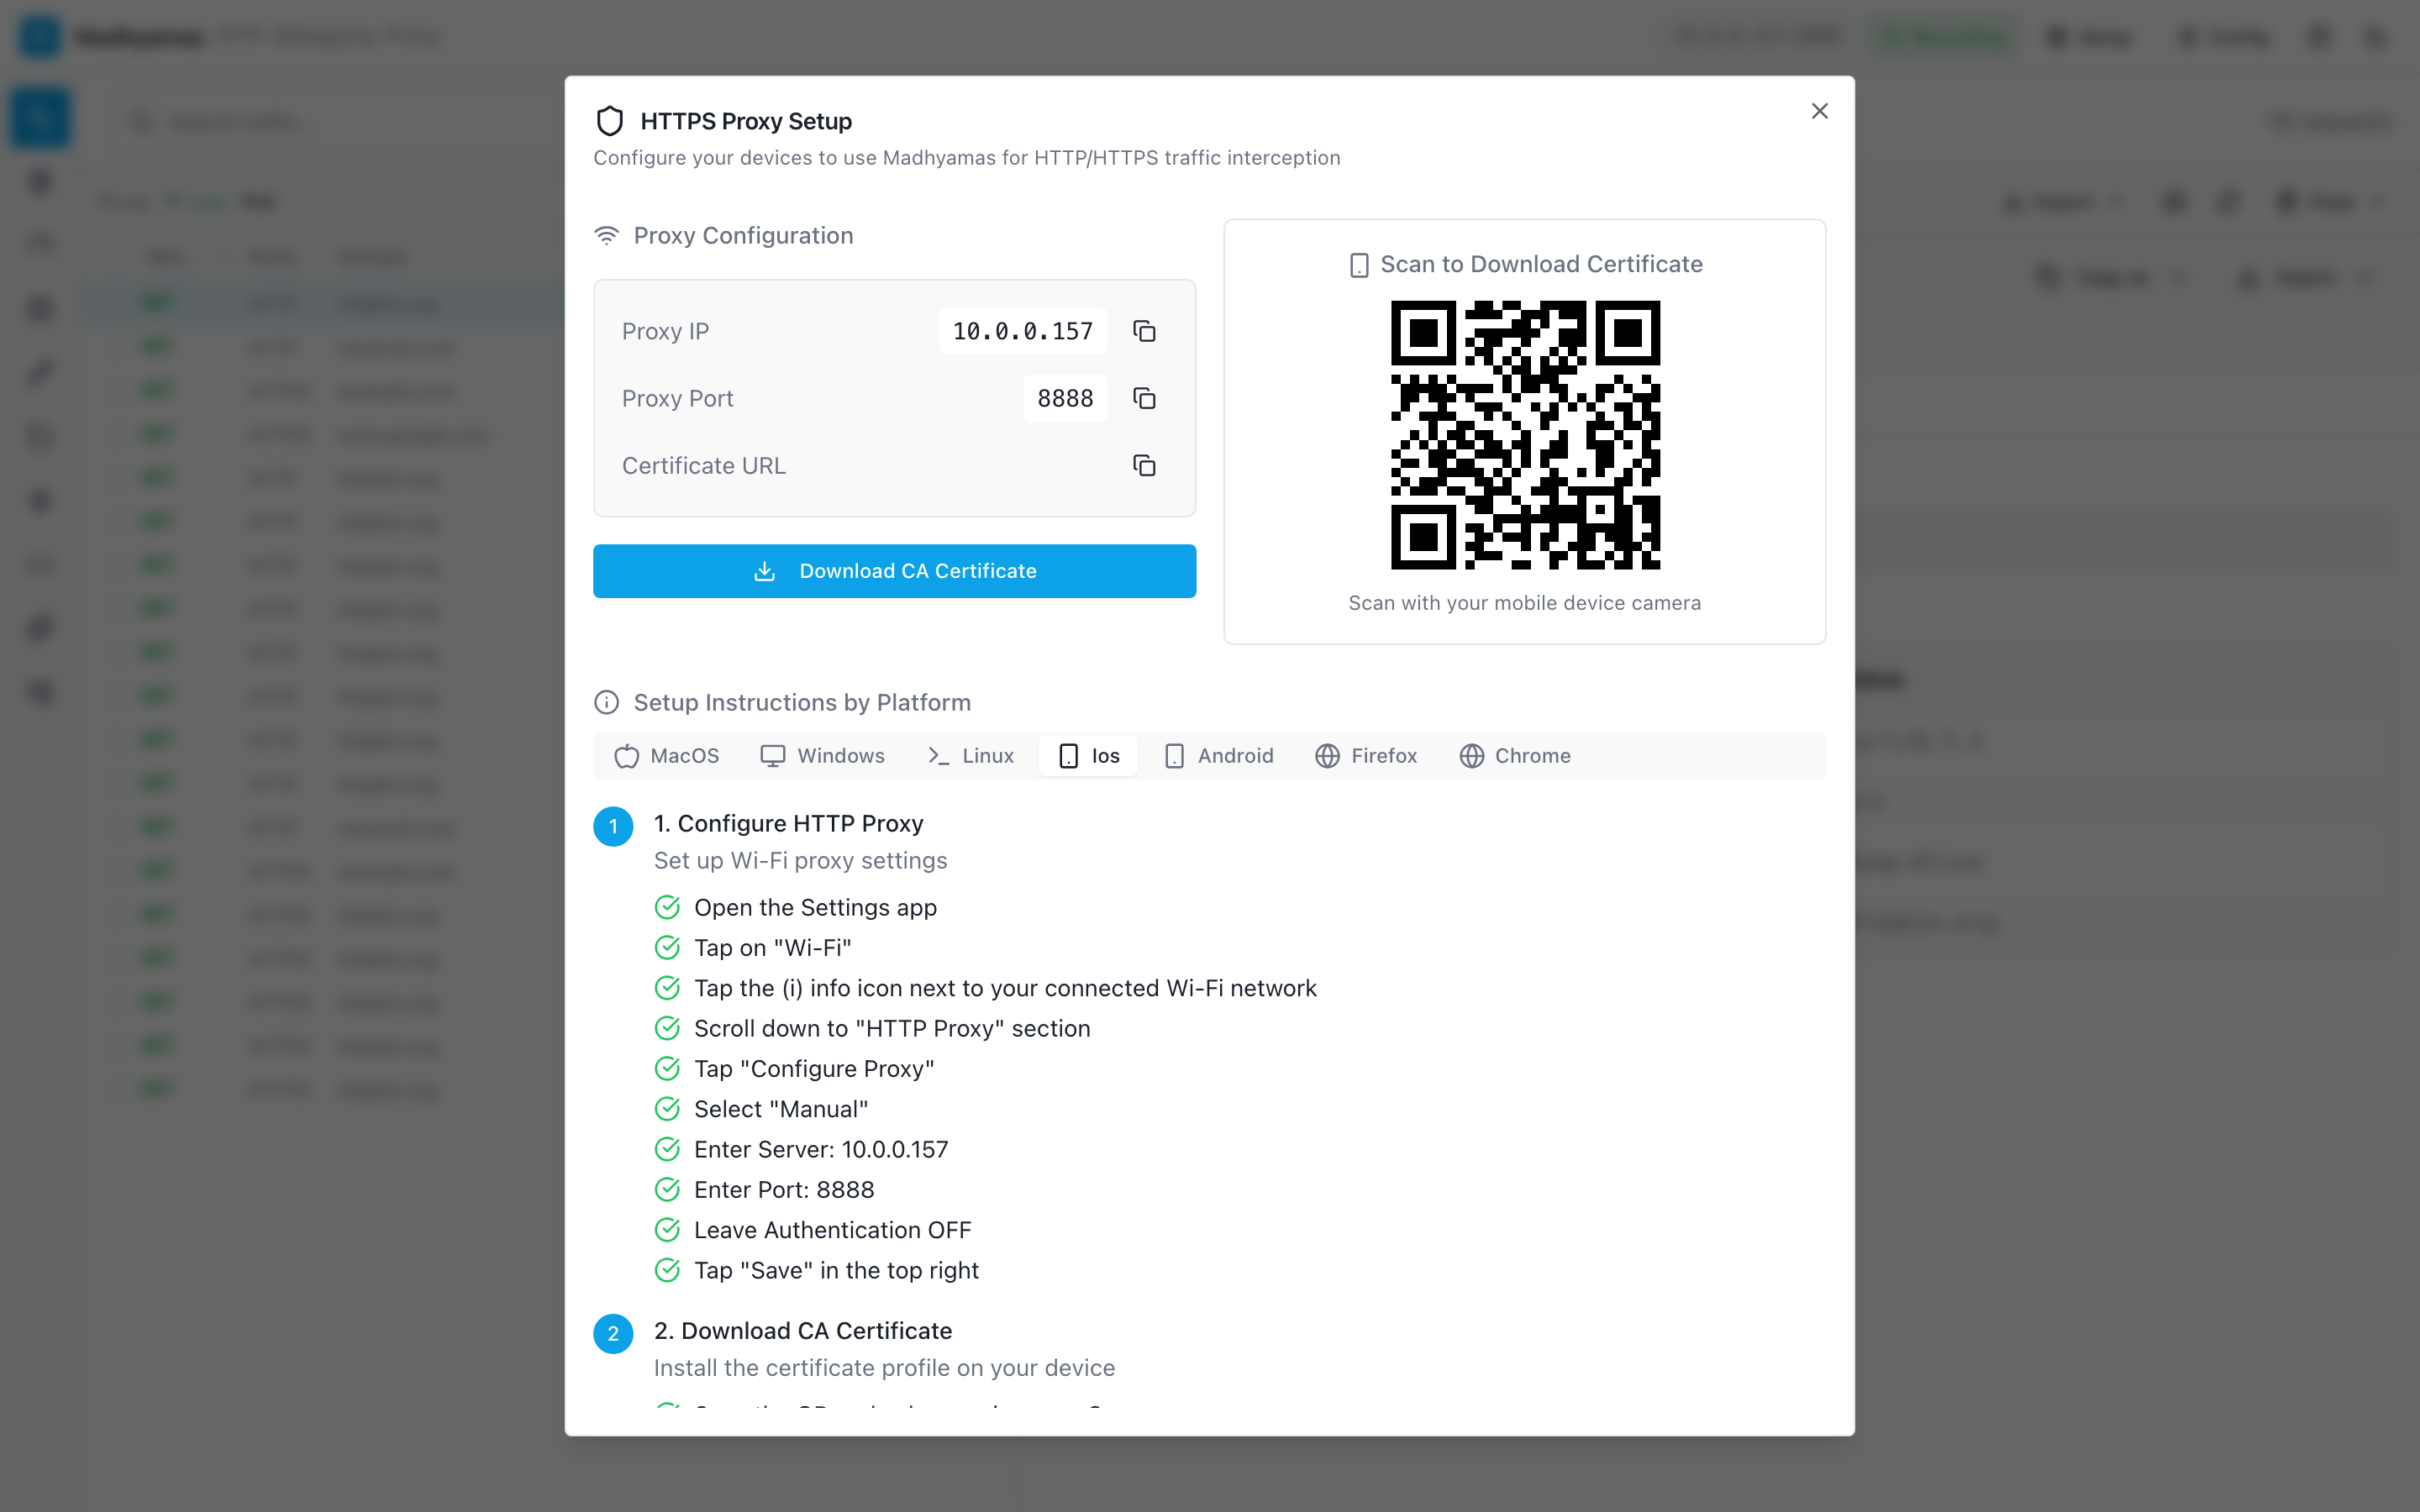
For detailed certificate installation instructions, see the HTTPS & Certificates guide.
What's Next?
- Traffic Inspection — Learn to filter, search, and analyze captured traffic
- HTTPS & Certificates — Set up certificate trust for HTTPS interception
- Configuration — All CLI flags, environment variables, and runtime settings
- Breakpoints — Pause and modify requests in real time
- Mocks — Create fake API responses for testing
- Mobile Setup — Connect your phone or tablet